Sunday, March 31, 2013

Lowe's Creative Ideas Project: Swing Shelf for Herbs


Last year, I was a member of the Lowe's Creative Ideas Team, for which Lowe's Home Improvement stores provided me with gift cards for purchasing materials to do projects around the house and yard.

One of my projects from last year was my  Lowe's Creative Ideas Pallet Project.  I used a pallet to make a decorative tool storage design.  It is by far the most viewed blog post I've ever done in the 6+ years I've been blogging (around 25,000 views) and it's still going over on Pinterest.  Participating in this each month was a challenge for me, but pretty fun too, so when they asked if would continue with the team this year, I said yes.

Our first project of the year took on an "Edible Gardening" theme.  Since winter remained firmly entrenched here in Northwest Ohio and we had seven inches of snow on the ground less than a week ago, this was a challenge in more ways than one.  I solved that problem by taking things indoors.

I've actually had this idea for a little while, but had never really sat down and thought it out in detail until now.  The concept is simple and putting it all together is pretty simple too.


Swing Shelf for Herbs

Materials list:

  • 1" x 6" x 4' unfinished poplar board  ($8.98)
  • Olympic ONE Quart Interior Semi-Gloss True White Paint and Primer in One ($12.24)
  • 3 4-inch terra cotta pots ($.97 each)
  • Valspar 12 Oz. Outdoor Gloss Spray Paint in Red Queen ($4.98)
  • LOCTITE Polyseamseal 6 oz White Latex Kitchen and Bathroom Caulk ($2.99)
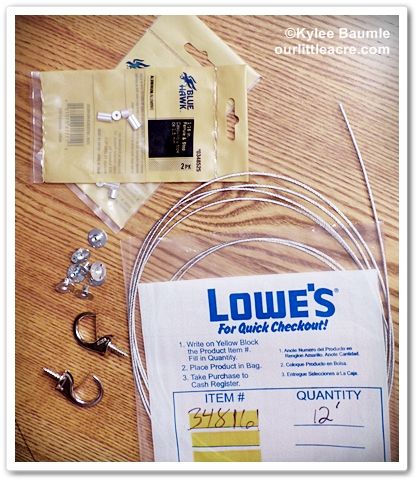
  • 12 feet 1/16" stainless steel cable wire ($3.24)
  • 4 sets: 1/16" ferrule and stop ($2.48)
  • 2 nickel-plated steel cup hooks ($1.96)
  • 8 #6-32 Zinc-Plated Standard (SAE) Brad Hole T-Nuts ($4.60)
  • 3 Bonnie Plants herbs ($10.44)


Since I wanted my terra cotta pots to be red, I started things off by spray painting them so they could be dry by the time I needed to plant them.  It took two coats of the paint to get the look I wanted, since terra cotta is porous. You could leave them unpainted.
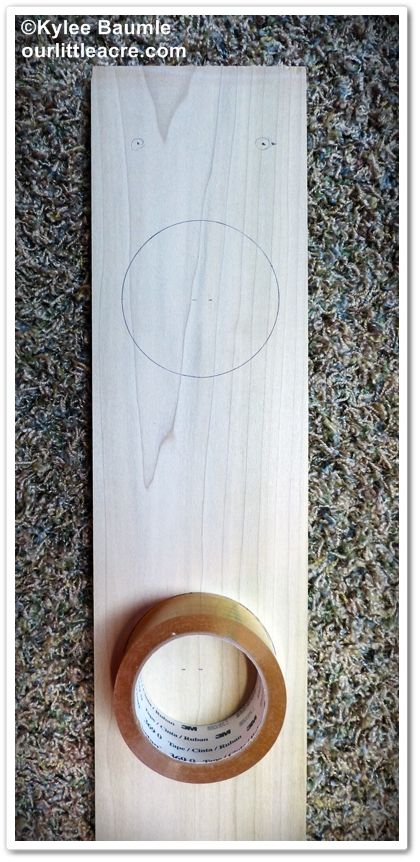


It just so happened that this roll of
packaging tape was the right
diameter for the holes to be cut.


While I was busy painting the pots, I enlisted the help of my husband in preparing the board.  It isn't that I couldn't do this part, it's that I like him to feel needed. He's good with power tools so I let him play with them.  I did the math - measured the inside width of the window where the shelf will hang, measured the circumference of the terra cotta pot just below the rim and used Π to figure out the diameter of the circular holes to be cut in the board. I did some more math to figure out where to place the three holes so they would be equidistant apart. Then I handed the board to Romie, with its markings for the jigsaw.

By the time I was done painting the pots the second time, the board was ready for painting.  Two coats of paint were needed here too.
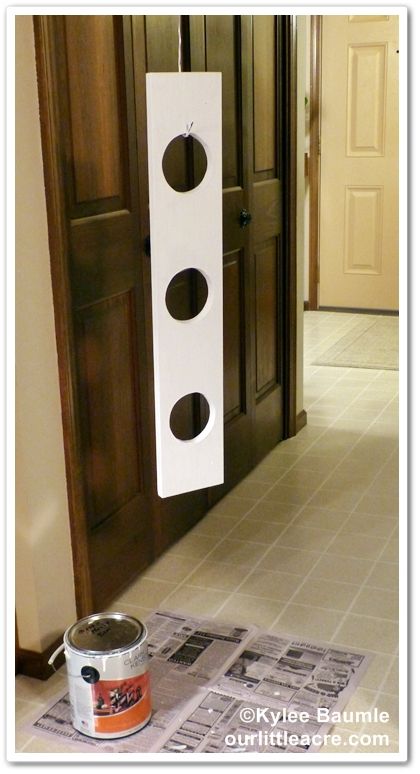


We didn't have to purchase the white enamel paint because we had some left
over from a previous project.


Hardware needed for hanging the shelf.

Once the paint dried on the board, Romie drilled two 1/16" holes in each end where the cable wire would be threaded through. These holes were two inches from the end of the board on each side.

I hammered a T-nut into each of these holes on both sides of the board.  This will provide reinforcement to the hole so that the cable wire isn't cutting into the wood.  It gives a more finished look to things as well.


Next came the trickiest part of the entire thing - threading the wire through the holes, making the loops for hanging, and making sure the wires are the same on both ends so that the shelf hangs level.  You can cut the wires the same length, but you also need to make sure that your loops for hanging are the same.
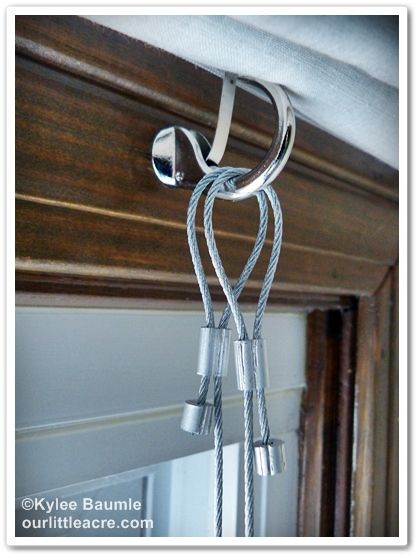
Hanging loops with ferrules and stops, crimped in place with pliers.


Before I made the wire hangers for this shelf, I had no idea what a ferrule was.  It can come in many forms but here, it's the little piece of aluminum through which the cable wire is threaded to secure the loop for hanging.  Once you have the wire threaded through, pliers can be used to crimp the ferrule so that the wire won't move. The stop is crimped on the end to cover the sharp cut wires and to prevent them from unraveling.

We screwed the hooks into the trim around the window at the top, under the existing window treatment and hung the shelf.


It's nice to have herbs close at hand when using them in cooking, and this shelf allows you to grow them in a sunny window; most herbs need full sun to do well. I chose Bonnie Plants flat Italian parsley, rosemary, and lemon thyme. I'll admit, I chose these because I like the look of their foliage and in the case of the rosemary and the lemon thyme, I love their fragrance.

Since the pots have a hole for drainage in the bottom, I needed to cover that and seal it so that when I water, it doesn't drip out the bottom.  I used plastic milk jug caps and caulked them to the bottom.
 
This lack of a drainage hole can be dealt with then by planting the herbs in a plastic pot that does have drainage and using the terra cotta pots as cache pots.

If you don't want to seal up the hole, you can remove the pots and take them to the sink, water them, and allow them to drain before replacing them in the shelf.

This shelf hangs in our utility room, where I keep quite a few houseplants, and there wasn't room on the small table in the window for more.  The window in this room has a southern exposure, which is just right for growing herbs.
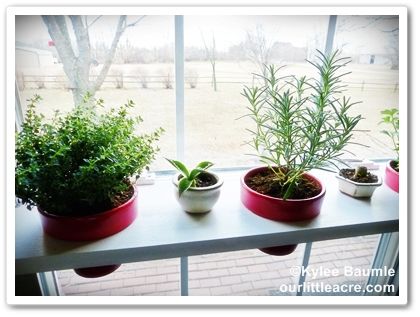
There's enough room in between the red herb pots to sit small planters on
the shelf if you want to.


The total cost for the project was $56.58, including tax.  

For more great project ideas, here are some helpful links:


_________________________
As part of the Lowe's Creative Ideas Team, I was provided with a Lowe's Gift Card to cover the cost of the project.

Saturday, March 30, 2013

Spring...finally!


Spring has been reluctant and petulant this year and regardless of how hard we try to not let it affect our mood, it has.  Winter in the north can be both exhilarating and exasperating, often at the same time. Last week at this time, we were anticipating two to four inches of snow and hoping it would be the last of the season. Snow in April isn't unheard of, but it's not welcomed no matter how quickly it melts.

OhNo and Sunny don't mind the snow.

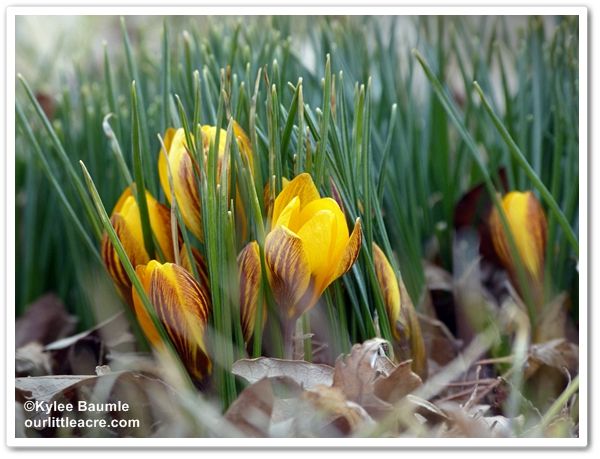
Well, we got seven inches here at Our Little Acre and some areas close to us got as much as ten.    There were some crocuses blooming before the snow, but they aren't as bothered by it as we are and now that the temperature has risen into the 50s, the snow is gone and the crocuses are fine.

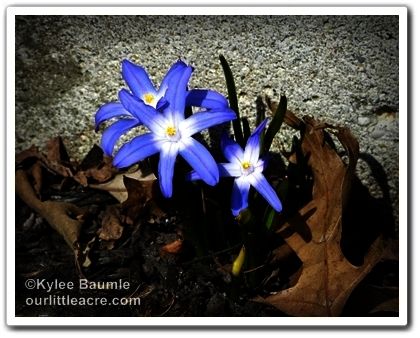
Chionodoxa
Romie and I walked around the yard last evening and looked at the spring flowers - what there was of them - and noted that most of the usual suspects were at least poking out of the ground, even if they weren't blooming.

There were snowdrops, hellebores, Dutch hyacinths, Eranthis, reticulated iris, Puschkinia, species tulips, hybrid tulips, Chionodoxa, daffodils, and crocus, of course.  But only the snowdrops, hellebores, Eranthis, and some of the crocus were in bloom.

What a difference a day makes!  Today, the reticulated iris, and a few Chionodoxa were open.

Iris reticulata 'Spring Time'
 
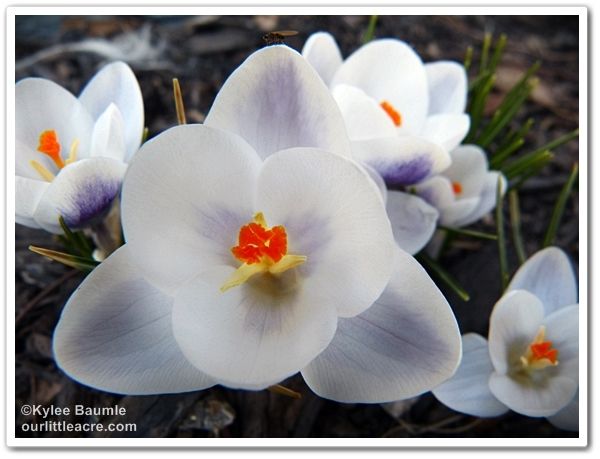
But the crocus...ohhhh the crocus!  There were many more of them and this is their day, their time to shine.

Crocus sieberi 'Tricolor'


Crocus 'Advance'
 
Crocus sieberi 'Tricolor'

 
Crocus sieberi 'Tricolor'

Crocus chrysanthus 'Prins Claus'

Crocus chrysanthus 'Fuscotinctus'

Crocus chrysanthus 'Prins Claus'


Last year, the hot - yes, HOT - weather in March put the spring blooming in overdrive and we had such a short time to enjoy it.  The joy of a slow and leisurely spring is a longer bloom time for those gaudy flowers we wait all winter to see.


Wednesday, March 27, 2013

Crock-Pot® Chicken Teriyaki


I can cook.  I'm fairly good at it.  But I usually just don't want to, because it's not high on my list of things that I think are fun to do. I'd much rather weed a garden.  However, when photos of delicious food start showing up in my Facebook stream, sometimes I get motivated to get barefoot and get in the kitchen.

It happened Monday.  My friend (and cousin) Algene posted a photo and recipe for Crock-Pot® Chicken Teriyaki that caught my eye.  I started salivating.  Anything teriyaki has that effect on me.  So I looked down through the list of ingredients and noted that I had all of them, including garlic from last summer's garden.

Then I looked at the directions.  It's a Crock-Pot® recipe, so how hard can it be?  It's not.  The most difficult thing was cutting up the chicken into bite-size pieces and that was a piece of cake.  (More about cake later...)

That settled it. We were having this for supper. I'm sharing it here, just in case it looks good to you, too.  It originally came from the Facebook page of Heavenly Recipes and if I spend too  much time on that page, I may just be forced to cook more often.  This particular recipe appealed to quite a number of people, because as of this evening, it's been shared 144,667 times.

Here we go:

Crock-Pot® Chicken Teriyaki

1 lbs chicken, cubed
1 cup chicken broth
½ cup teriyaki sauce
⅓ cup brown sugar
3 garlic cloves, minced


1. Combine chicken broth, teriyaki sauce, brown sugar and garlic cloves in large bowl.


2. Add chicken to sauce, and mix.


3. Pour chicken mixture into
Crock-Pot®.

4. Cook on low 4-6 hours, or until chicken is cooked through.


5. Serve over hot cooked rice and spoon on extra sauce if desired.


It should be noted, if you saw the recipe on my or on any other Facebook page, that the photo posted was NOT a photo of this recipe.  The photo showed sesame seeds in the sauce and a thicker sauce. Most of us that tried the recipe agreed that the sauce was more watery than we'd have liked.  The remedy for that is to cut back the broth drastically or as one my friends suggested, cut it out entirely. I would do that next time.

But it was delicious, and I will make it again.  Now, about that cake...

My cousin also posted a photo of white cake with caramel frosting, which reminded me of a recipe my mom had when I was a kid.  My dad loved it and I loved it, and I dug it out and made it.  So we topped off our teriyaki meal with caramel cake.  Yummmmm...


Sunday, March 24, 2013

Weekend Wisdom: Tomato Tidbit


As one who dislikes raw tomatoes, I pick up on anything that reinforces my choice to not eat them.  I have extolled their nastiness here, so I won't go into that again, but thanks to my friend Charlotte, over at Dirt du Jour, chalk one up on the side of eating them cooked, not raw.

She brought to my attention a news article reporting on studies that state the virtues of lycopene.  No surprise there.  We all know that lycopene is a valuable anti-oxidant that is beneficial to our skin, and helps protect us against certain types of cancer as well as osteoporosis. Lycopene also provides some protection from the sun's UV rays.

But did you know that cooking those tomatoes greatly increases the body's ability to absorb that lycopene?  Just like carrots, cooking them makes them better, healthwise. Yeah, I don't like raw carrots either.  Maybe my body just senses what is good for it. (Not sure why I crave English toffee, however.)

Not only that, but when eaten with a small amount of oil or fat (such as cheese on pizza), the ability of lycopene to be absorbed by the intestines is enhanced.¹

Let me say that again:  Cooked tomatoes are better for you than raw ones. That means you should eat more ketchup, tomato soup, chili soup, pizza, spaghetti sauce, and drink more tomato juice.

Lucky me, I like all those things.

_________________________________
¹Elaine Magee, MPH, RD, "Health properties of tomatoes," WebMD, date accessed March 24, 2013.

Saturday, March 23, 2013

"Once Upon a Flock" Blog Tour & Giveaway!


Chicken owners know how utterly charming chickens can be. Others may not realize this. While most chickens initially become part of the family in order to contribute to the home larders in one way or another, they can blithely charm their owners with their quirky and winsome ways. No one was more surprised by this than my husband and I.

If I'd read Lauren Scheuer's Once Upon a Flock: Life With My Soulful Chickens before we got our hens two years ago, I would have known just how wonderful their personalities can be. If my husband had read it, it wouldn't have taken three years to convince him to get chickens. But this delightful romp through Lauren's backyard has only just now hit the bookstore shelves.

If you're contemplating adding backyard chickens to your life, this will make your decision easier.  If you already have them, you'll certainly relate to the tales of Lucy, Lil' White, Hatsy, and Pigeon, as well as the family terrier, Marky, who is fiercely protective of the flock. There's plenty of drama, because...well...with animals, there's always drama, right?

Lauren Scheuer and Lil' White
The tales of life with chickens are by themselves more than enough to carry this book, but we readers get a wonderful bonus in the accompanying photography and original artwork by Lauren that's peppered throughout the stories.  And you're going to be totally jealous of this: Lauren surprised me with a drawing of my very own!


Here's Violet, one of our Silver Laced Wyandottes, and the most friendly member of our own flock.  She comes when I call her, she squats in submission for me to pick her up, and she's content to sit on my shoulder.  And, for all the times I've held her and been her perch, she's never ever made a "mess" on me. Such a good girl.


As part of the official blog tour for Lauren's new book, I received a complimentary review copy of Once Upon a Flock and her publisher is making a copy available to one of my readers!  All you need to do is leave a comment to this blog post, telling me what names you'd give your chickens if you had them, or if you already have chickens, what their names are.  Remember, I'll need to contact you if you're the randomly selected winner, so be sure I've got a way to do so.

Be sure to comment by midnight, Friday, March 29th (that's Good Friday), and I'll use Random.org to select a winner from all eligible entries.  Giveaway is only for US residents.  (Sorry!)

Here are the other stops on the blog tour, where you can have another chance to win a copy of the book:

March 19 Tilly's Nest
March 20 Hencam.com
March 27 Garden Rant

And for the continuing adventures of Lauren's flock, as well as the occasional "Where's Marky?" hide and seek fun, visit Lauren's blog, Scratch and Peck.


_____________________________________________________

And the winner is...


From Beyond My Kitchen Window

I've sent an email your way and need for you to send your mailing address so that your copy of Once Upon a Flock can be mailed!  Congratulations!  And thanks to everyone who entered! Special thanks to Lauren for her beautiful drawing of Violet and for asking me to be on her Virtual Book Tour!


_________________________
The publisher, Atria Books, provided me with a review copy of Once Upon a Flock.  The opinions expressed here are my own. There were 47 eligible entries after removing a second comment left by the same commenter and Lauren's initial comment.

Sunday, March 17, 2013

How To Get the Perfect Tomato


Tomatoes are pretty - I'll give you that.
My gardener friends are always talking about their tomatoes. There must be a bazillion kinds of tomatoes and they have their favorites, yet they're always on the lookout for a "better" one.  Those tomato lovers - it seems they're never satisfied.

Well, it's a pretty well-known fact that I don't like raw tomatoes.  I've got good company in Southern Living Magazine's The Grumpy Gardener (Steve Bender) and Chris Tidrick (From the Soil), who don't like 'em either.  Our distaste for raw tomatoes even garnered the attention of Scientific American ("Taster's Choice: Why I Hate Raw Tomatoes and You Don't") and Living Green Magazine, which republished my original article last May ("Please Don't Make Me Eat Them").

But now, just maybe there's a way to make the perfect tomato - maybe one that even I will eat without cooking it.  I doubt it though.  After all, it would still be a tomato, with that slimy, seedy texture that just feels ucky in my mouth. But that's not my point here.  The point is someone has written a book about creating custom vegetables and flowers in your own garden. So if you don't particularly like what you're growing, breed your own!

Requisite photo of Joseph and me in lieu of the video we intended to make,
but we talked too much, and then it was time for Joseph to go.

My mystery guest that came for lunch on Friday was Joseph Tychonievich, whose new book, Plant Breeding for the Home Gardener: How to Create Unique Vegetables and Flowers, was just released on March 7th.  Yes, there were several of you that guessed correctly in the giveaway - more about that in a bit, after I talk about Joseph's book.

I wasn't so sure how I was going to like it when it arrived here about a week ago.  I mean, really.  It's only plant geeks that like this kind of thing, right?  Don't you believe it.  (Okay, so I am a bit of a plant geek, but that's beside the point.) The short story is that I liked it quite a bit and there are some very good reasons that you just may like it too.  For the longer version, you can read my review on Horticulture Magazine's website.

Timber Press, the publisher, has provided a copy of Joseph's book to the winner of my giveaway, and Joseph, who is nursery manager at Arrowhead Alpines in Michigan (read about my visit there last year) threw in a plant for the lucky winner.  That plant will be custom chosen for the winner, depending on where the winner lives.  No use sending a plant that won't be happy in its new home, right?

So, now I suppose you're dying to know who the winner was.  Everyone who made a correct guess (and each person had three chances) got one entry for each correct guess.  I wrote each one on a piece of paper and had my husband, who couldn't care less about any of this, choose a name from the bowl.


 And the winner is...


Congratulations, Gregory!

I will be contacting you so that I can get your mailing address for shipping your prizes to you. And thanks to everyone who played along, including Timber Press, Arrowhead Alpines Nursery, and especially to Joseph, for wanting to stop and visit, and for writing the book in the first place.  Well done, one and all!

________________________________
I was also provided with a free copy of Plant Breeding for the Home Gardener for possible review.  I was not obligated to do so, however.  All opinions stated here and in my reviews published on the Horticulture website are my own.

Friday, March 15, 2013

Amaryllis Blooms Never Fail to Deliver


I received a surprise package a couple of months ago from Longfield Gardens and if you know me or have read this blog for awhile now, you know that what was in that package thrilled me to no end.

Because I am an amaryllis addict.

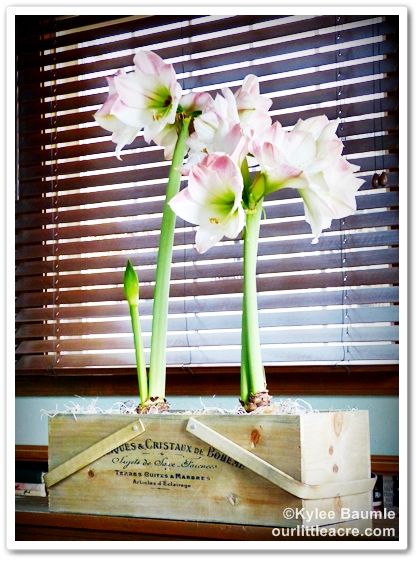
The package contained a very cool vintage-looking rectangular wooden box  with handles.  Inside the box was potting soil, decorative moss, and two gigantic amaryllis bulbs - two of the largest bulbs I've ever seen and I've seen some gigantic ones.  Both of them had offset bulblets that will one day be large enough to separated from the mother bulb.  When it comes to amaryllis bulbs, size matters - the bigger, the better.


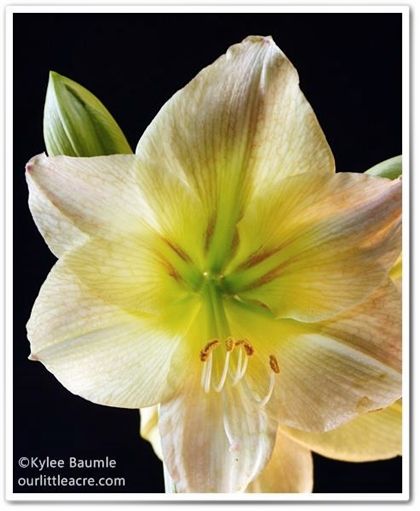
I'd gotten a few amaryllis (Hippeastrum sp.) bulbs from Longfield Gardens late last fall and I shared the photos of 'Limona' on my Our Little Acre Facebook page.

Hippeastrum 'Limona'

That bulb first bloomed at the beginning of December, and went on to put out a second and yet a THIRD flower stalk, the latter still in bloom now, three months later.  It's the first time I've ever had an amaryllis bulb produce three flower stalks.  Like I said, size matters!

I potted the new bulbs up, gave them a shot of water, and put them on a shelf in the family room.  It wasn't long before I noticed that bulbs starting to put out flower stalks - two each from each bulb.  About six weeks after planting, I got the first bloom.

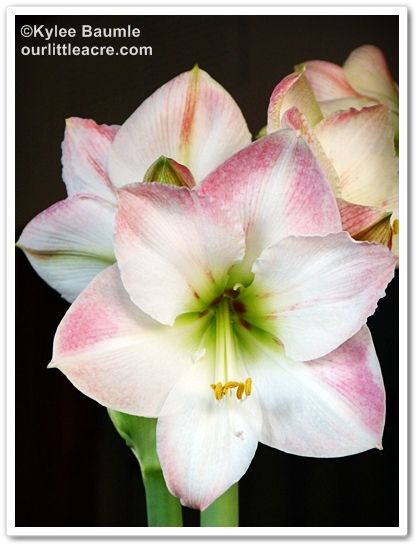
Hippeastrum 'Apple Blossom'

Eventually, each bulb threw up two flower stalks and two of those stalks had five flowers on each stalk - one more than the usual four.

Hippeastrum 'Apple Blossom'


The cultivar is 'Apple Blossom', which has white petals blushed with pink, and an apple green throat.

Hippeastrum 'Apple Blossom'

When these are finished blooming, the foliage will emerge (I can already see it starting).  I'll cut the spent flower stalks off at the base and allow the foliage to grow and do its thing.  I plan to keep these bulbs and plant them out in the garden for the summer, where they'll use that foliage to feed the bulb for flowering again next season. I'll dig them up and trim off the foliage just before frost in the fall and store them in my cool, dark basement for about two months before potting them up and starting the process all over again.

Amaryllis is the gift that just keeps on giving, and really, they couldn't be easier, whether you've got a green thumb or not.

_________________________
Thank you to Garden Media Group and Longfield Gardens LLC for arranging to have the amaryllis bulbs and the amaryllis kit sent to me free of charge.


blogger templates | Make Money Online